Nose Landing Gear Failure During Landing
Air Creebec Inc
Embraer EMB-110P1 C-FPCU
Cochrane, Ontario
The Transportation Safety Board of Canada (TSB) investigated this occurrence for the purpose of advancing transportation safety. It is not the function of the Board to assign fault or determine civil or criminal liability. This report is not created for use in the context of legal, disciplinary or other proceedings. See Ownership and use of content. Masculine pronouns and position titles may be used to signify all genders to comply with the Canadian Transportation Accident Investigation and Safety Board Act (S.C. 1989, c. 3).
Summary
The Air Creebec Inc. Embraer EMB-110P1 aircraft (registration C-FPCU, serial number 110445) was on a training flight with two pilots on board. At approximately 1130 eastern daylight time while landing on Runway 13 at Cochrane, Ontario, the nose landing gear partially collapsed during the landing roll. The aircraft veered to the right and briefly exited the edge of the runway. The left brake was applied to prevent a complete runway excursion and directional control was regained, whereupon the aircraft was manoeuvred back onto the runway where it was brought to a stop. The aircraft received substantial damage to the nose section and the right propeller was damaged when it struck a runway edge light. There were no injuries to either of the pilots.
Factual information
History of the Flight
The training flight originated from Timmins, Ontario. The aircraft had behaved normally on departure from Timmins and there were no indications prior to landing at Cochrane that a nose gear collapse was imminent.
The crew performed a simulated instrument flight rules (IFR) non-directional beacon (NDB) Runway 31 approach circling for Runway 13 at Cochrane. After a low approach for Runway 13, a visual circuit was flown, culminating with the accident landing. The aircraft landed on the main landing gear with the nose gear being lowered normally with no excessive force at touchdown.
Runway 13/31 at the Cochrane Airport is asphalt covered, 4500 feet long, and 100 feet wide. At the time of the landing, the runway surface was dry.
Records indicate that the aircraft was certified, equipped, and maintained in accordance with existing regulations and approved procedures. The weight and centre of gravity were within the prescribed limits.
Flight Crew
The pilot-in-command held an Airline Transport Pilot License with a current medical certificate and pilot proficiency check. The co-pilot held a Commercial Pilot License with a current medical certificate and was undergoing training on type. The flight crew was certified and qualified for the flight in accordance with existing regulations.
Weather
Weather at the time of the occurrence was clear skies, visibility 15 miles, and the wind was calm. The weather is not considered to have been contributory to this accident.
Recorders
The aircraft was not equipped with a flight data recorder and none was required by regulation. The airplane was equipped with a cockpit voice recorder.
Service History of the Nose Gear Assembly
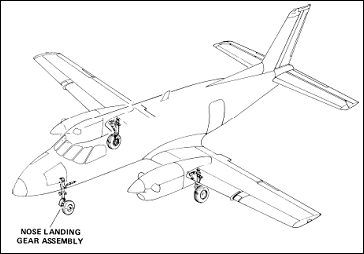
The complete nose gear assembly was shipped to the TSB Engineering Laboratory for examination. In service records since overhaul were also obtained from the operator. The nose landing gear (see Figure 1) was identified as part number 110P2-410-21, serial number 507 and was originally manufactured by a French company called ERAM (now Messier-Dowty).
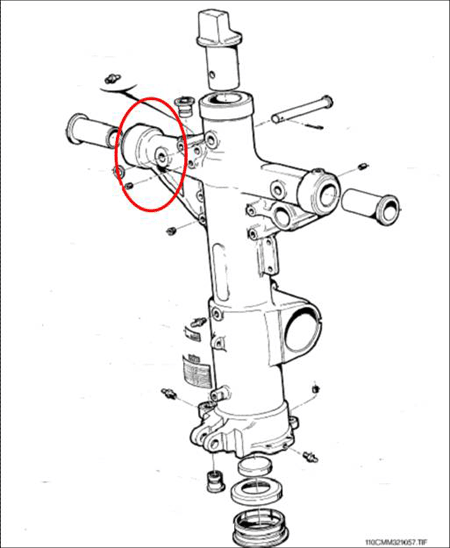
The area of the nose gear failure is shown in Figure 2.
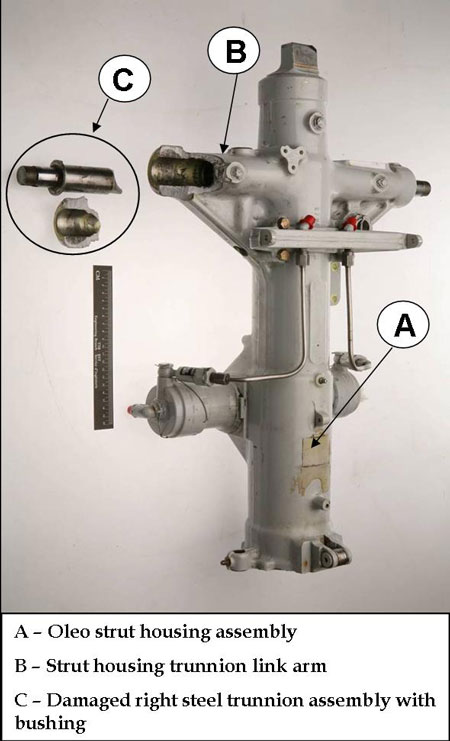
The nose landing gear (see Photo 1) was overhauled by Aeromil (formerly Aeromech PTY LTD) in Australia on 11 January 2007. The time since new on the Authorised Release Certificate from Aeromil was marked "Unknown," indicating Aeromil may not have been provided with this information when the nose gear was shipped to them for overhaul. Air Creebec Inc. received the nose gear and installed it on the aircraft on 28 January 2007. At the time of installation, the aircraft had 24 859 hours and 37 591 cycles in service.
Since the nose gear was installed on the aircraft, it had accumulated 1408 hours and 1893 cycles in service.
From the time the nose landing gear was overhauled to this date, there were no maintenance arrangements between Transport Canada and the Australian civil aviation authority. Therefore, the Authorized Release Certificate that Aeromil used to certify the work performed on the nose landing gear did not meet the requirements of subsections 571.11(3) and 571.08(1) of the Canadian Aviation Regulations (CARs). The nose landing gear should not have been installed on the aircraft. Air Creebec was unaware of this when the landing gear was installed on the airplane. Maintenance records indicated that this was the third nose landing gear installed by Air Creebec on its fleet of EMB 110 aircraft. The company has since altered its maintenance practices.
Aeromil Procedures During Overhaul
The overhaul procedures Aeromil used were in accordance with the most recent version of the Embraer Component Maintenance Manual, Rev. 2, 30 March 2005 TP110/251. Aeromil's process for non-destructive testing (NDT) of aluminum alloy parts, which included the nose landing gear strut housing of the failed landing gear, was performed using ARDROX Fluorescent Penetrant 970P25 and by following the procedures in subsection 3-8 to 3-11 of the Embraer Component Maintenance Manual.
Examination of the Nose Landing Gear
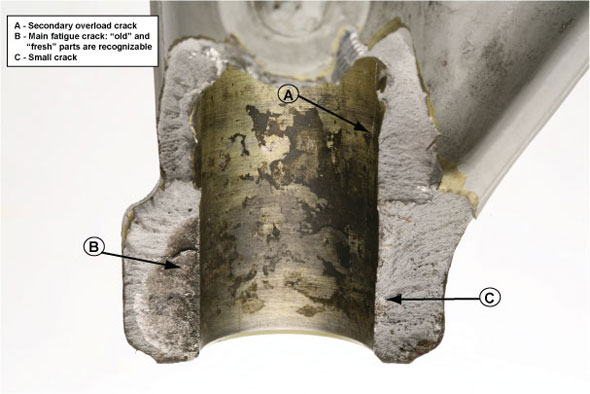
A visual inspection of the fractured surfaces identified several visible features on the fractured strut housing trunnion arm. The main fatigue crack consisted of a large dark area; in addition, smaller fingernail-shaped fatigue cracks were visible on the opposite bore diameter of the fractured housing. The rest of the fracture indicated a ductile overload failure. The inner surface of the aluminum alloy strut housing arm displayed an uneven yellowish colour, which is characteristic of anodized aluminum. The colour became paler towards the opening of the arm, indicating some wear at the surface (see Photo 2). Ratchet marks and progression marks were also visible and are characteristic of fatigue cracks.
The observed damage to the strut housing locking head was mostly plastic deformation on one of the corners. The damage was considered as secondary to the trunnion link failure.
Optical Microscopy
Optical microscopy confirmed some of the surface features identified during the visual inspection, such as beach marks and small fatigue cracks. After the degreasing of the parts, an obvious distinction remained between two sections of the main fatigue crack. The bore surface also displayed evidence of surface wear, and the surface colour changed from an anodized aluminum surface to almost bare metal (see Photo 2).
Fracture Surface Examination
Scanning Electron Microscopy (SEM) and Energy Dispersive X-Ray Spectroscopy (EDS) examinations were performed. Two distinctive sections of the bore were heavily oxidized and covered with a substance in many places. An EDS spectra was performed to distinguish their composition. The section without the substance primarily showed an aluminum and oxygen composition. At higher magnifications the areas had a "dry mud" appearance, which is not typical for alumina scale on an aluminum surface. Such composition may be an indication of aluminum hydroxide. The other section was also covered with an unidentified substance.
Fatigue striations became evident in a section of the main fatigue crack. The striations did not have a sharp appearance, possibly due to rubbing and oxidation. EDS spectrum and maps of the substance covering the inner bore of the arm showed a compound that was rich in carbon, oxygen, sulphur, and silicon.
One section of the main fatigue crack under SEM examination displayed clear fatigue striations and was clean and free of debris. EDS spectra from these sections revealed insignificant amounts of oxidation, but did show the elements that are identifiable with the aluminum alloy of the strut housing.
The small broken strut piece displayed two small fingernail-shaped fatigue cracks. An SEM examination of these cracks showed signs of oxidation, suggesting they were not recently developed cracks. Bright deposits near the origin of the cracks had similar chemistry to the compound which was also found in the main fatigue crack.
Housing Bore Surface and Compound Identification
The bare sections of the bore surface had identifiable circumferential machining or grinding marks. All of the bare areas should have been anodized aluminum alloy as per specification. It appears that the anodized layer on the bore surface was substantially worn. The worn areas are identifiable by the lighter yellow colour that was observed during the initial visual inspection.
The compound on the bore fracture was recognizable even after the part was degreased. The compound was identified as a bushing locking adhesive, Wurth A-04-0368 DOS Flange Sealant. Aeromil used the adhesive during the bushing installation into the trunnion arm on the nose gear assembly. The adhesive contains elements of carbon, oxygen, silicon, and sulphur. There was also a higher quantity of silicon within the crack, more so than the level within the adhesive, which may have been residual from the dye penetrant (developer) used for the bore inspection during the overhaul.
Inner Surface near Fatigue Crack Origin
The region within the bore's surface near the crack origin displayed not only circumferential grooves (attributable to machining or grinding), but also evidence of significant wear. Numerous pits were found in some of the sections as were multiple secondary cracks, some filled with the above-mentioned adhesive. Other features found around this location were uneven contrast of bands with different shades of grey, suggesting compositional differences due to different degrees of oxidation as a result of uneven wear of the anodized layer.
Identification of Other Foreign Material
Within the housing bore surface, other elements were found. Some of these elements were of the same composition as those found on the fatigue fracture surface. One was identified as molybdenum disulfide. The identified element is commonly used in other areas of the aircraft, possibly as a lubricant, but should not have been found between the bushing and the bore because the two should be tightly sealed together.
Analysis
The nose landing gear was overhauled and certified by Aeromil, an Australian company. Canada and Australia do not have any maintenance agreements in place, meaning that each country does not accept the other's certification on any parts where maintenance has been performed. Unknowingly, Air Creebec installed the overhauled nose landing gear on its aircraft with an Australian Authorized Release Certificate that is not recognized or accepted by Transport Canada.
Examination of the fractured surfaces by visual, optical and SEM methods suggested that the failure of the strut housing in a single-cycle ductile overstress mode was preceded by progressive mode cracks. These cracks were fatigue cracks and the main larger crack led to the eventual failure of the nose landing gear. The main fatigue crack had two distinctive areas that grew in two stages over an unknown period of time. One area had clear fatigue striations with little oxidation and debris. The second area had severe oxidation, rubbing, and an integrated substance, and is considered to be the older of the two sections. The substance was identified as hardened bushing locking adhesive, with elements of carbon, oxygen, silicon, and sulphur.
The main fatigue crack in the housing displayed multiple initiation sites. There were also imperfections on the inner surface of the housing that could have contributed to the initiation of the crack. This could not be proven because the bore surface was worn and damaged. The multiple initiation fatigue crack origins possibly indicate more than one point of initiation for the fatigue crack. The origin of the initial crack could not be ascertained. It may have been induced during the machining process of the inner bore surface at manufacture, or possibly due to the condition of the tooling used in fabrication, or it could have been initiated by the introduction of foreign matter or debris.
Entry of a foreign material, identified as molybdenum disulfide, into the bore suggests a small gap developed between the bushing and the bore, which likely occurred during the gradual opening of the main fatigue crack during post-overhaul service. The wear on the bore surface and pitting also suggest looseness of the bushing in the bore. The pitting was possibly a result of moisture entry into this area during the service life of the nose landing gear.
Traces of the bushing locking adhesive were found in an area of the fatigue section of the crack and in secondary cracks nearby. If the adhesive had cured (solidified), it is unlikely that it could have penetrated the cracks. Therefore, it is reasonable to believe that the cracks were present when the adhesive was in liquid state, such as during the installation of the bushing at the time of overhaul, and that it penetrated into the pre-existing cracks in the bore arm.
The crack should have been identified during overhaul but, for unknown reasons, it was not. This could have been due to workload, working conditions, tools, operator ability, lack of supervision, misreading or misinterpretation of instructions. As the component was overhauled in Australia approximately two years prior to the event, it was deemed unlikely that further investigation would uncover issues prevailing at that time, and this was not pursued.
The following TSB Engineering Laboratory report was completed:
- LP 121/2008 – Nose Landing Gear Failure
This report is available from the Transportation Safety Board upon request.
Findings as to Causes and Contributing Factors
- The nose landing gear failure was caused by the fracture of the oleo strut housing trunnion link arm, which was initiated by an existing fatigue crack in the bore of the link arm.
- The crack propagated during the pre-overhaul service life of the nose gear and progressed further during the post-overhaul service of the aircraft, leading to an overload fracture.
- For undetermined reasons, the crack went unnoticed at overhaul.
This report concludes the Transportation Safety Board's investigation into this occurrence. Consequently, the Board authorized the release of this report on .


